Issue #282 – Wednesday, November 13, 2019
Spine Curls – the “Bridge” to Your Inversions
by Julie Driver
I love spine curls!
They are a fabulous foundational exercise that gives immense movement satisfaction whatever your level of expertise. Spine curls are like an onion – the more you practice them, the more layers you peel away to discover a new depth to the exercise. Clients love them for the spinal movement and how delicious they feel through the front of the thigh. I particularly love the subtle way such a simple exercise can introduce and facilitate a deeper understanding of the more advanced work to come.
But first…
What is a spine curl?
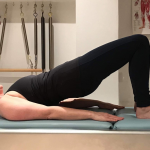
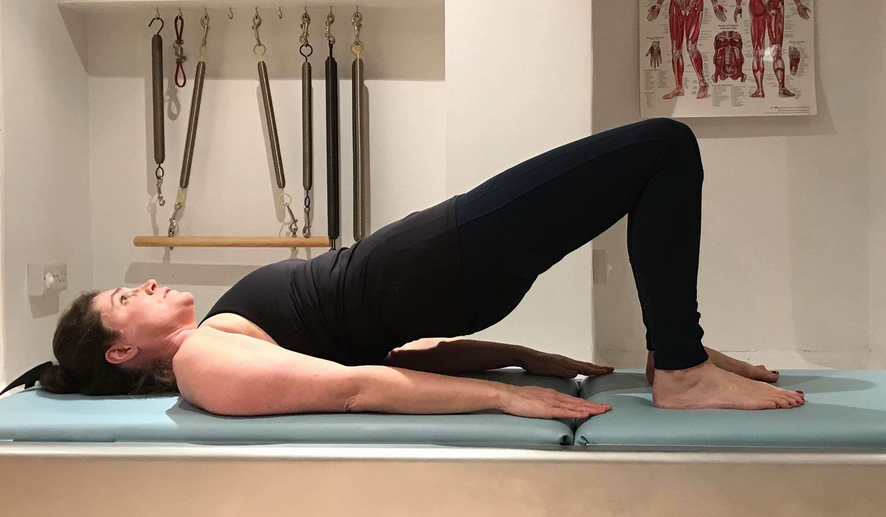
Different schools have different terminologies for this exercise, so for clarity: “Spine Curl” requires the client to be able to posteriorly tilt the pelvis, extending the hip joint and to lift sequentially through the spine from the tailbone to the tips of the shoulder blades. In this elevated position, the ASIS should be level with each other and with the pubic bone, creating a long diagonal from the knee through the hip to the shoulder joint. The pelvis is in a neutral position to the femur…as it would be in standing.
The term for this exercise without spinal articulation is “Bridge”. This is where the spine moves spatially between the hips and shoulders in one movement, but without movement between the spinal joints.
“Bridge” works well as a name for both variations as ultimately they have the same end point: the weight of the body distributed evenly between both feet and the upper back without compression into the neck and head.
It is this understanding of the movement and proprioception that makes the spine curl particularly effective for introducing the concept of the rolling exercises and spinal inversions.
Spine curls and Inversions: A tale of two exercises
Spine curls teach sequential movement of the spine from bottom to top and top to bottom, encouraging elongation through the spine. They strengthen the hip extensors while actively lengthening and opening the hip flexors. Teaching the client how to access the back of the body to help open the front of the hip joint and body.
Spine curls also teach the client how to transfer body weight from the support of the mat to being suspended between the feet and the upper back. This is the vital link between the spine curl and inversions: if both are executed correctly, there should have been no transference of weight into the cervical spine and head.
A way to check this in a spine curl is to try to lift your head off the mat while your spine is lifted from the mat. If you are unable to lift your head, then your weight is NOT evenly distributed into the feet and upper back (n.b. I do not recommend this as a test for clients!).
This is when we need to review the execution of the spine curl and correct any issue.
The exercise: A Review
Start Position
-
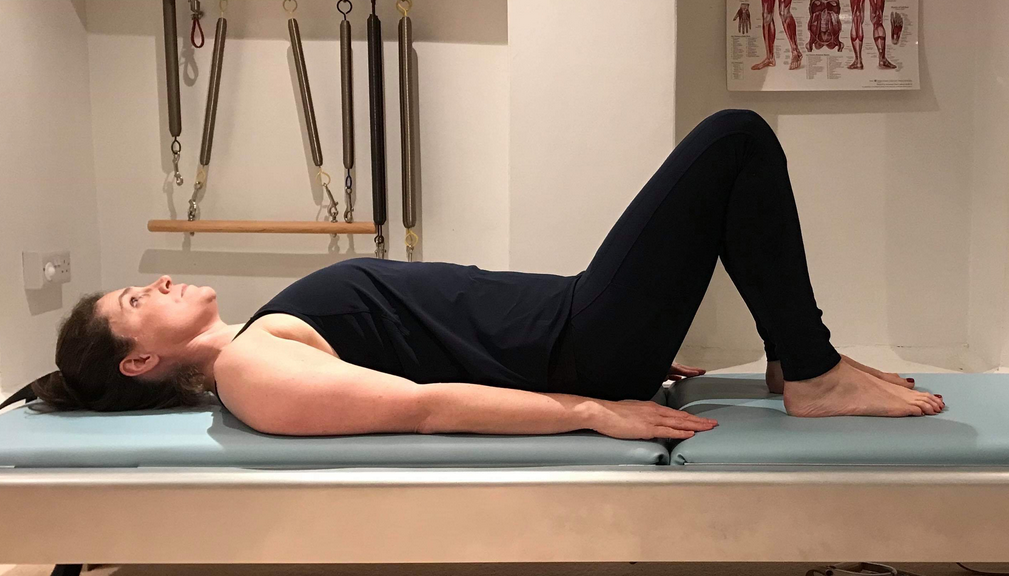
Lying on their back semi-spine, neutral spine and pelvis. Knees bent, hip width apart and parallel
-
Feet are aligned and the weight is even between both feet.
Movement
-
Inhale to prepare
-
Exhale to posteriorly tilt the pelvis, extending the hips and flexing the lumbar spine. Begin to roll the spine sequentially from the tailbone to the tips of the shoulder blades
-
Inhale to maintain the lift of the spine and pelvis
-
Exhale to roll the spine sequentially back to the mat
Tips to help the movement
-
Any static misalignment will mean the movement will begin in misalignment
-
Think of rolling the spine like links of a chain
-
Opposition! Particularly while spine is returning to the mat, continue to think of lengthening through the crown of the head.
-
Imagine rolling down from the back of the throat
-
Think of the body weight going across the middle of the upper back and arms
What to look for during movement
When the client begins the movement, observe HOW they initiate and WHERE they initiate the movement. Here are some typical (and probably familiar!) ways that clients ‘interpret’ the exercise:
-
The “fold in half”: this client ‘sinks’ into the waist band and then pushes up into chest and feet, without a sequential spinal movement
-
The “thruster”: thrusts the lumbar spine up and causes movement higher up the spine than needed, shunting the weight into the neck and head and effectively pinning themselves to their mat
-
The “shoulder rounder”: as they begin to lift their pelvis and spine, there is an associated rounding forward of the shoulders, indicating they are not creating a stable foundation in their upper body.
-
The “caterpillar”: this client does some combination of the above and ends up migrating backwards on the mat until their feet are too far away from their bum and they often complain of hamstring cramp
-
The “twister”: this client presses or pushes into one foot more than the other affecting the pelvis and spinal alignment, potentially rotating and/or laterally flexing the spine.

Refining the link between spine curl and inversions
By addressing and solving issues that arise in the spine curl, we can potentially prevent them happening in the more advanced work. For example, consider a “shoulder rounder” working on the Rollover:
If the shoulders round in a spine curl (because they cannot anchor through their upper back), this will be magnified in the rollover due to the additional load and leverage of the legs. If the client cannot control the movement and redistribute the weight evenly and correctly, the additional weight of the legs can result in compression of the spine.
Spine curl into inversion…bridging the gap or The Wave.
There is another great exercise to help establish rolling exercises using a combination of the spine curl and the sit up. This exercise helps the client to feel the rolling motion moving fluidly and sequentially from the bottom of the spine to the top of the spine and then in reverse top to bottom.
Start position
-
Same as spine curl except with hands behind the head as if about to do a sit up.
Movement
-
Same as spine curl except with the spine in the lifted position the hands are now behind the head.
-
Exhale and begin to lift the head and chest into a sit up, but rather than stopping at a chest lift, allow the movement to continue through the spine until the pelvis returns to neutral.
-
The head and chest will now be lifted off the mat as if doing a sit up.
-
Inhale
-
Exhale to begin lifting the pelvis and spine back up into a spine curl all the way until the head is down again.
-
Repeat the movement from top to bottom and bottom to top so the client can feel the wave of motion through the spine.
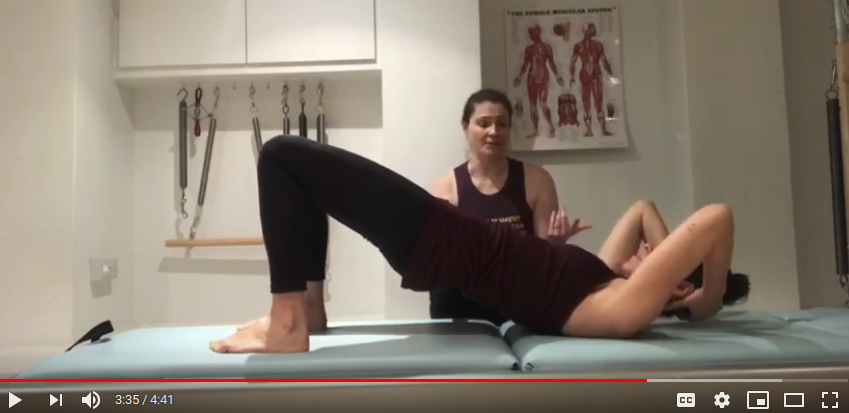
Check out Julie’s instructional video!!
Initiation + Intention = Improvement
How we develop our clients’ understanding of spinal movements will be the foundation for how and when we can progress them. Time spent practicing and becoming competent at these skills will develop the proprioception and understanding of how to control the additional load and leverage of the legs into larger movements, without compression of the spine or neck and head.
So whether it’s a rollover, open leg rocker or a short spine we need to know where to roll to on the spine, how to roll there and how to come out of the inversion with accuracy, connection, control. The spine curl can be the perfect tool for the Pilates teacher’s toolbox. Invert, roll over and have fun!
Authors Note: In July 2017, I was diagnosed with a bulging disc in my cervical spine (not as a result of practicing Pilates!). The disc was bulging inward towards my spinal cord, so I was advised NOT to do jarring activities such as horseback riding or skiing. However, as part of my Pilates practice, I DID continue with Spine Curls as they felt great and when executed properly should NOT compromise the neck but aid in lengthening and axial elongation. In January 2018, my neurosurgeon was delighted to tell me there was no evidence of my ever having a bulging disc in my neck.
Pilates Result!
 Julie Driver (www.juiledriverpilates.com) is a passionate believer in the power of Pilates. She has been teaching for nearly twenty years and in 2014 won the prestigious international ‘Pilates Anytime Instructor of the year” competition. Whenever her schedule allows, she returns to the US to host new online classes for them as a returning guest Instructor.Julie is a perennial student of the method, continuing her own education with regular 1-1 lessons and studying with mentors. Her North London studio provides a learning environment that nurtures continued growth and progress for both Pilates teachers and Pilates enthusiasts.
When a ski accident in 2008 resulted in serious damage to her left leg, surgeons predicted a year long recovery and a permanent limp. Using the expert guidance of her teachers, complemented by her own knowledge of Pilates and the apparatus, Julie was walking unaided and without a limp within less than 9 months.
With a lifelong passion for equine studies, Julie knows that Pilates is the perfect way for riders to improve their technique and create a stronger and deeper relationship with their horse.
Julie is also a regular teacher and presenter at Pilates conferences internationally.